
Account Security
How to Secure Your Google Account and Gmail
Your Google Account connects Gmail, Drive, Calendar and other services. It may also receive password-reset messages for your other accounts. If someone takes it over, accounts that use it for sign-in or recovery may also be at risk.
This desktop guide helps you review sign-in methods, recovery information, devices, connected apps and Gmail settings. Each section explains what to change and how to check it. Follow the troubleshooting guidance if something goes wrong, then use the closing checklist to review your account.
Who this guide is for
This guide covers personal Google Accounts with Gmail addresses. It does not cover administrator-managed Google Workspace accounts. If your account is managed by work or school, contact your administrator before changing settings.
Prerequisites
-
A computer with an up-to-date operating system and supported browser. For Step 6, also check Google’s passkey device and browser requirements (opens in a new tab). Passkey support depends on the device and browser combination.
-
A personal Google Account with a Gmail address, a working sign-in method, and access to your password if you use password-based sign-in.
-
Access to your configured authentication method, such as a phone, authenticator app, or security key.
-
Working recovery options or backup codes, where available.
-
An existing trusted browser session kept open while you test sign-in in a separate supported browser profile. A password change can sign out sessions, so confirm backup access before making changes.
Note: Google Account labels, security settings, and available verification methods may vary by account and device.
Suspect an account compromise? If you cannot sign in, start with Google Account Recovery (opens in a new tab). If you can still sign in, follow Google’s compromised-account guidance (opens in a new tab) to review activity and secure access before continuing with routine checks.
Before you start: Use a device you trust and keep its software up to date. Enter passwords and verification codes only in the genuine Google sign-in flow. Never give them to someone claiming to provide account support.
Step 1: Open Your Google Account and Find the Security Area
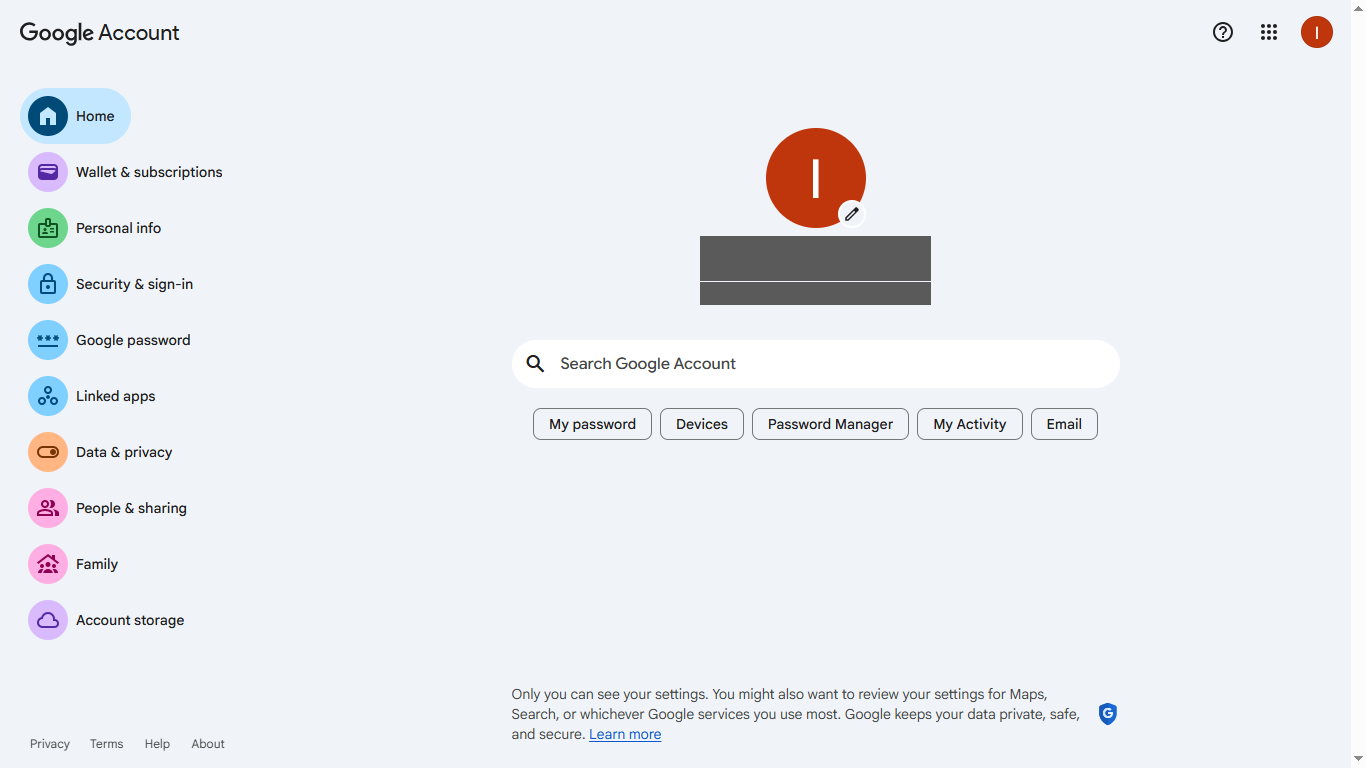
What to do. Go to myaccount.google.com (opens in a new tab) and sign in. In the left-hand menu, select Security & sign-in.
Why it matters. This is the control panel for your account, and the left menu also shows other areas you will use in this guide: Google password, Linked apps, and Data & privacy.
What you should see. The Security & sign-in page, with sections for sign-in methods, account activity and devices. Figure 1 shows the Home page navigation you use to reach it.
How to verify. Check that you are reviewing the intended account and that the page heading is Security & sign-in. The recommendations shown depend on that account.
Step 2: Run Security Checkup
What to do. Open Google Security Checkup (opens in a new tab). You can also reach it through the security recommendations on the Security & sign-in page.
Why it matters. Security Checkup provides personalized recommendations about your account, including recovery information, devices and app access.
What you should see. Recommendations and status indicators based on your account. Their wording and appearance can vary; a green indicator is not a guarantee that the account is secure.
How to verify. Read each recommendation and check the affected setting after making a change. If a recommendation remains unresolved, note why and follow the linked Google guidance. Do not dismiss it simply to clear a warning.
Official guidance: Google Account Security Checkup help (opens in a new tab).
Step 3: Understand the Sign-In Methods Before You Change Them
People often mix up the terms below, so it is worth separating them clearly.
-
Password. A secret used for password-based sign-in. Keep it long and unique to this account.
-
2-Step Verification (2SV). With password-based sign-in, Google can ask for a second check, such as a prompt, authenticator code or security key. This reduces the risk from a stolen password but does not make all methods phishing-resistant. A passkey can satisfy Google’s sign-in checks without a separate second challenge. See Google’s 2SV guidance (opens in a new tab).
-
Passkey. A credential you use by unlocking a compatible device or security key. It lets you sign in without entering a password and provides protection against phishing. See Google’s passkey guidance (opens in a new tab).
-
Security key. A physical authentication device, commonly connected by USB or NFC. Depending on its capabilities, it can serve as a second step or store a passkey; creating a passkey on a hardware key requires FIDO2 support.
-
Account recovery. Google’s process for regaining access when you cannot sign in. Recovery information can include a phone number, a separate email address or an eligible recovery contact. Backup codes have a different role: they replace a second verification step, not a forgotten password. See Steps 5 and 7.
Step 4: Review Your Password and Change It if Needed
What to do. First decide whether a change is needed. Change a weak, reused, exposed or suspected-compromised password. An old change date alone is not evidence that it is unsafe.
Before changing it, confirm you can use your authentication and recovery options. A password change signs you out of many sessions, but some devices and app connections remain signed in. Review these separately in Steps 8 and 10. See what happens after a password change (opens in a new tab).
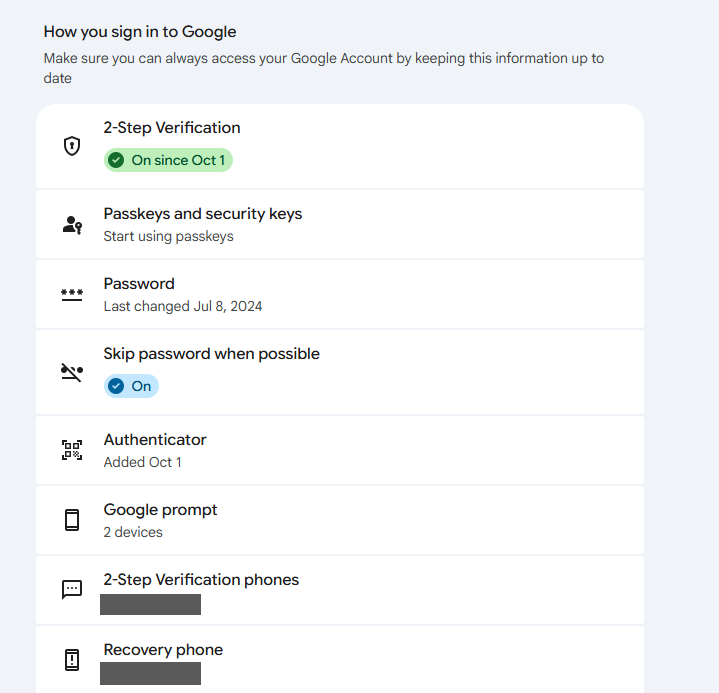
If a change is needed, open Google password in the left menu, or Security & sign-in > Password. Verify your identity if prompted. Enter and confirm a new password, then select Change password.
Why it matters. A password reused on another service can put this account at risk if that service is breached. Google recommends at least 12 characters. Use a long, unique password, and avoid personal details or predictable patterns. See Google’s password guidance (opens in a new tab).
What you should see. A password form with New password, Confirm new password and Change password controls. Figure 3 illustrates the form, not a completed password change.
How to verify. If you changed the password, reopen the sign-in settings and check the updated Last changed date. With backup access available, test password-based sign-in in a separate browser profile. If no change was needed, continue to Step 5.
Tip. A trusted password manager can help you create and store different passwords for each account. Google Password Manager is one option.
Step 5: Turn On and Review 2-Step Verification
What to do. Open your 2-Step Verification settings (opens in a new tab). If it is off, select the option to turn it on and follow Google’s setup prompts. If it is already on, review the available methods. See Google’s setup instructions (opens in a new tab).
Why it matters. 2-Step Verification adds protection if someone steals your password, but not all methods resist phishing. Never share verification codes or approve a sign-in prompt you did not initiate. Passkeys and security keys provide phishing-resistant sign-in.
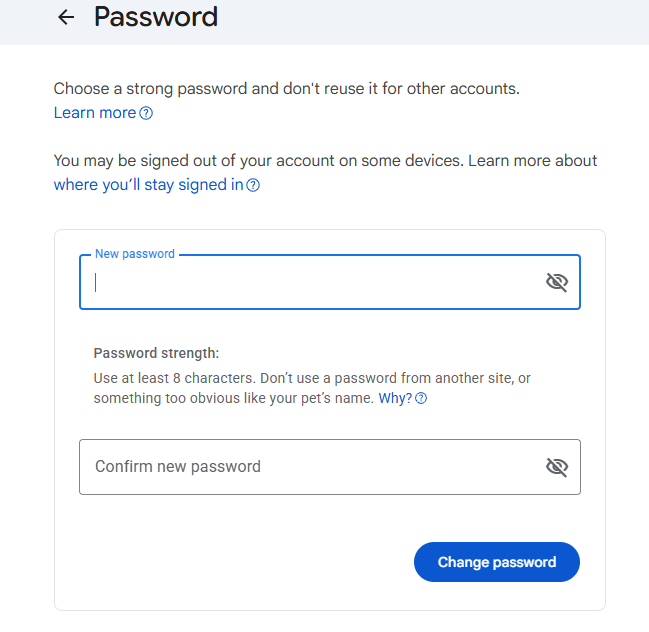
What you should see. A status indicating that 2-Step Verification is on and the methods available for your account. Figure 2 shows one example; your methods and dates will differ.
How to verify.
-
Confirm which method you intend to use and which independent backup you can access. These are planning choices, not necessarily labels in Google’s interface.
-
Keep a backup that remains accessible if your usual phone is lost. An authenticator app on that same phone is not an independent fallback. Backup codes stored separately or a second suitable device can provide another route.
-
Open Google Account > Security & sign-in > 2-Step Verification > Backup codes. Select Continue if shown, then Get backup codes. Store the codes securely somewhere you can access without your usual phone or Gmail session. Each code is single-use; creating a new set invalidates the previous set. Never share them or include them in screenshots. Backup codes are unavailable for accounts in Google’s Advanced Protection Program. See Google’s backup-code instructions (opens in a new tab).
-
To check password-based sign-in, open a separate browser profile and select Try another way if a passkey is offered first. Choose the password option and complete any second step Google requests. To check a backup code, choose Try another way and the backup-code option when available, then mark the code as used. Keep your trusted session open. If the method you need is unavailable, follow Google’s sign-in troubleshooting (opens in a new tab) instead of repeatedly changing settings.
Note on “Skip password when possible.” Google can offer a passkey-first sign-in experience. A successful passkey sign-in need not include a password or a separate second-step prompt. Keep other working sign-in and recovery options available.
Step 6: Add a Passkey
What to do. On a compatible device that you own and control, open Passkeys and security keys (opens in a new tab). Select Create a passkey and follow the device-unlock prompts. Check Google’s supported devices and setup instructions (opens in a new tab) if the option is unavailable.
Why it matters. Passkeys resist phishing by authenticating you without giving a password to a fake sign-in page. Create them only on devices you personally own and use: anyone who can unlock the device may be able to access your Google Account.
What you should see. If you have none yet, the list shows an invitation such as “Start using passkeys.” After setup, your device name appears with the date it was created.
How to verify. Keep an existing trusted session open and test sign-in in a separate supported browser profile. Choose the passkey when offered and complete the device-unlock prompt. Do not remove a working alternative until the replacement has been tested.
A new passkey may take up to seven days to become available for sign-in. If it is missing, use Try another way, retain your existing method and follow Google’s troubleshooting instructions. Do not assume a missing prompt means setup failed.
Step 7: Check Your Recovery Information
What to do. Open Google Account > Security & sign-in. Under How you sign in to Google, select Recovery phone or Recovery email. Verify your identity if prompted, choose the add or edit option, enter details you control and complete the on-screen verification. Use a recovery email different from the address used to sign in.
If Recovery contacts is available, select Add recovery contact, enter the address of someone you know and trust, and send the invitation. Their acceptance is followed by a seven-day wait before recovery use. Availability varies by account, region and device.
Recovery-phone changes can take up to seven days to take effect. Google may also send codes to previous recovery information for seven days after a change. Keep working alternatives available; do not assume every new option is immediately usable. Backup codes are covered separately in Step 5.
Source: Google Account recovery information (opens in a new tab).
Why it matters. Current recovery details give Google ways to help you regain access. Remove details you no longer control and protect the separate email account you use for recovery.
What you should see. Your recovery phone (partly hidden), recovery email, and buttons to add more options.
How to verify. Reopen the recovery settings and check the saved details. Confirm you can receive messages at the phone number and access the separate email account. For a recovery contact, check the invitation status and waiting period. Do not deliberately lock yourself out to test recovery; these checks do not guarantee that a future recovery attempt will succeed.
Step 8: Review Your Devices
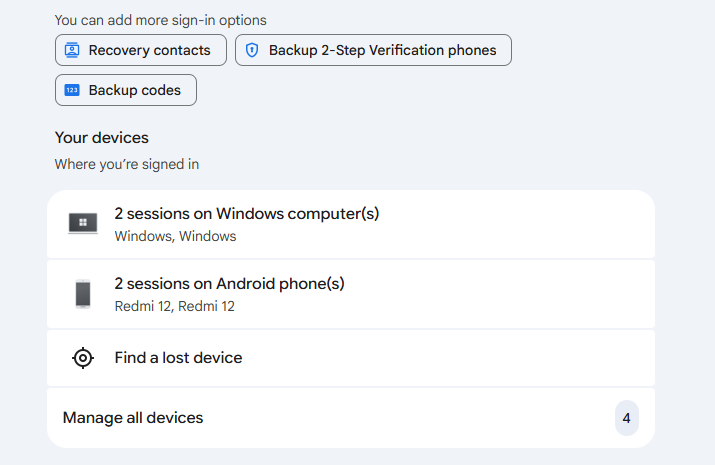
What to do. On the Security & sign-in page, scroll to Your devices and select Manage all devices.
Why it matters. A signed-in device or session may have access to your Google Account, including Gmail. The device list can include browser, app, and service sessions, including recently signed-out sessions. Multiple sessions may belong to one device, and background syncing can update activity times. Locations shown may be approximate. Before removing a device, review all sessions listed under its name.
Source: Google Account device activity (opens in a new tab).
What you should see. A list or summary of devices and sessions, with controls to inspect their details. The counts in Figure 4 are examples, not a target for your account.
How to verify. Open each entry and compare its device, time and location with your activity. VPNs and mobile networks can affect the location shown. Sign out sessions you cannot account for; when removing a device, review all sessions with that name. Reopen the list and check the Signed out indication. A signed-out entry may remain visible for a time.
Step 9: Read Recent Security Activity
What to do. Under Recent security activity, select Review security activity. You can also open myaccount.google.com/notifications (opens in a new tab).
Why it matters. Recent security activity can help you identify unfamiliar sign-ins or changes to authentication settings.
What you should see. Recent sign-ins or changes to security settings, where available. Review the details of each unfamiliar event; an event title alone is not enough to identify who performed it.
How to verify. Open the event and compare its details with your own activity. If it was not you, choose the option indicating that and follow Google’s security prompts. If you still suspect compromise, use the Troubleshooting section even if the location seems familiar.
Step 10: Remove Linked Apps You No Longer Need
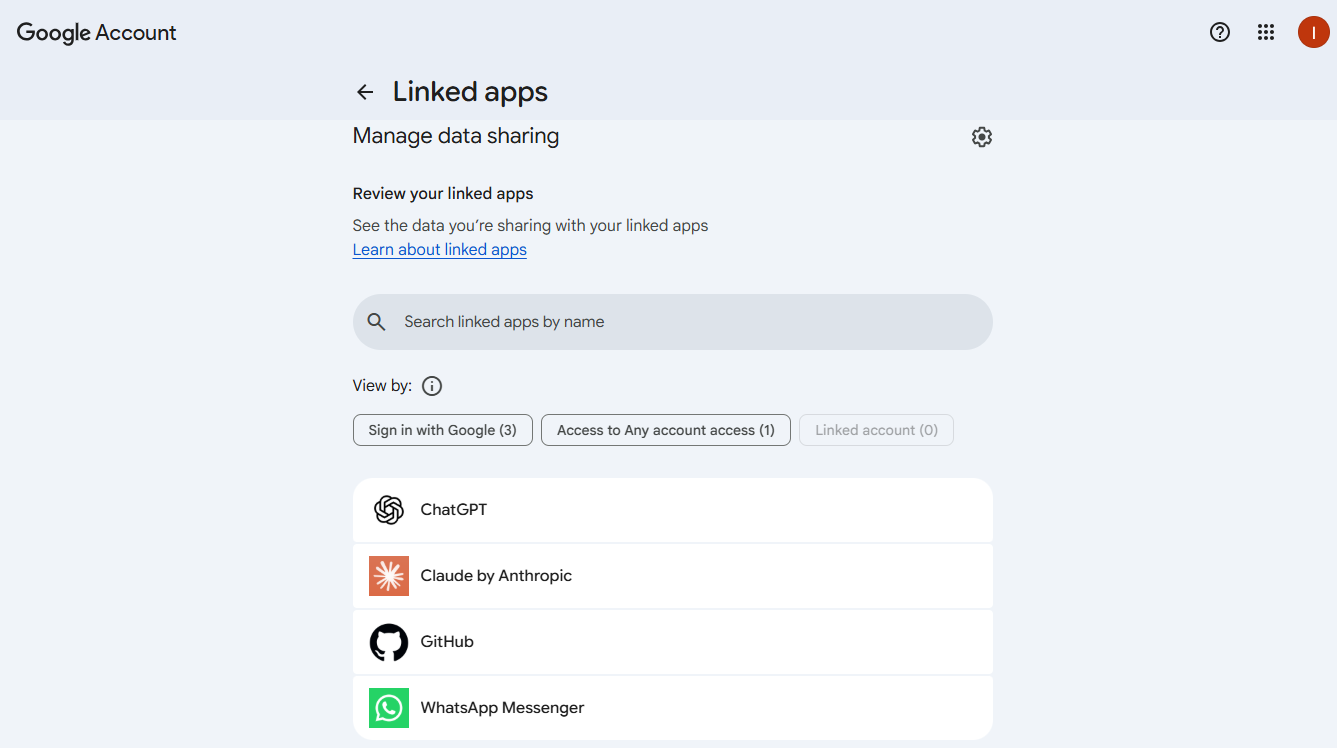
What to do. Open Linked apps (opens in a new tab), select an app and inspect the connection type before removing anything. One app can have more than one connection:
Sign in with Google: open the sign-in connection’s details, select Stop using Sign in with Google and confirm. This stops that sign-in connection; it does not delete the other service’s account or data. Check that you have another way to sign in to a service you still need.
Access to your Google Account: open the app’s access details, review its permissions, then select Remove access and confirm if it no longer needs them.
Linked account: open the details for Google’s access to the other service, select Delete link and confirm. Features that depend on that link may stop working.
See Google’s connection-management instructions (opens in a new tab) for the current controls. Revoking access does not necessarily delete information a provider already copied.
Why it matters. Signing in to a service, granting it access to Google data, and allowing Google to access that service are different connections. Review the actual permissions rather than assuming every listed app can read Gmail or Drive. Only retain connections you recognize and need.
What you should see. A page titled “Manage data sharing” with filters such as Sign in with Google and a list of apps (for example, AI tools, developer platforms, and messaging apps).
How to verify. Reopen the app’s details and confirm that the specific connection or permission you removed is no longer active. The app may remain listed if it has other connections. Do not reconnect a service removed because of a security concern without first establishing that it is safe and still needed.
Step 11: Consider Enhanced Safe Browsing
What it does. Enhanced Safe Browsing can provide additional phishing and malware protection in Chrome and Gmail when you are signed in.
Privacy trade-off. This option shares additional information with Google, including URLs and samples of pages. Read Google’s Enhanced Safe Browsing information (opens in a new tab) before deciding whether to enable it.
What to do. Open Google Account > Security & sign-in, find Enhanced Safe Browsing for your account and select Manage Enhanced Safe Browsing. Turn the option on or off according to your choice.
How to verify. Reopen the setting and confirm its status. Do not assume this changes every browser’s settings. Google documents conditions for enabling Enhanced Safe Browsing in signed-in Chrome; check the linked guidance if you also want to verify Chrome’s setting. Turning the account option off can take up to 24 hours to complete.
Step 12: Secure Gmail Itself
On a computer, open Gmail > Settings > See all settings. Review forwarding, filters and delegation separately.
Review forwarding
-
Open Forwarding and POP/IMAP or Forwarding, depending on the label shown.
-
If automatic forwarding is not intended, select Disable forwarding, then Save Changes.
-
Check the saved forwarding addresses. Remove any address you did not authorize using its removal control. Do not add a forwarding address just to complete this review.
Review filters separately even after disabling automatic forwarding: a filter can forward selected messages. See Google’s forwarding instructions (opens in a new tab).
Review filters
-
Open Filters and Blocked Addresses.
-
Read each filter’s criteria and actions. Pay particular attention to rules that forward, delete, archive or mark messages as read.
-
For an unauthorized rule, select Delete and confirm. For an intentional rule that needs correction, select Edit, adjust the criteria, select Continue, then update its actions and select Update filter.
-
Return to the list and check the saved rule. See Google’s filter instructions (opens in a new tab).
Review delegated access
-
Open Accounts and Import or Accounts, then find Grant access to your account.
-
If a delegate is unauthorized, select Delete beside that entry and confirm. If you never granted access, do not add a delegate for testing.
-
Reopen this section and confirm the unwanted delegate is no longer listed. If you find a delegate you did not add, follow Google’s guidance to change your password and secure the account. See Gmail delegation help (opens in a new tab).
Check the result
-
Reopen the forwarding, filter and delegation sections and verify that the intended settings were saved.
-
From a second account you control, send a new, non-sensitive message to the Gmail inbox you are checking. For example, if a retained filter matches a subject keyword, put that keyword in the test subject.
-
Check the message’s location and labels against the intended rule. If it is missing, inspect Spam, Trash and All Mail and recheck the filter criteria before assuming it was lost.
-
If testing an intentional forwarding rule, check only a destination you also control. Do not send anything to a suspicious address to see whether it still receives mail.
A successful delivery checks one scenario, not every filter or access route. Combine the message test with the settings review; do not interpret it as proof that the whole account is secure.
Important: If you find unauthorized changes, treat them as a possible account compromise and follow Google’s compromised-account recovery guidance (opens in a new tab).
Step 13: Recognize and Report Phishing
Security settings cannot decide whether every request is genuine. Review unexpected messages before following links, opening attachments or sharing information.
Before clicking, ask four questions:
-
Sender: Do I recognize it, and does the full address match the organization?
-
Message: Was I expecting it?
-
Link: Does its destination match the service you intended to use? Hover to preview it without opening it. If uncertain, open the service from your own bookmark or type its address.
-
Request: Is it asking for a password, verification code, money, or urgent action?
Example. A message says: “URGENT: Your Gmail account will be suspended today. Click here to verify your password.” Do not follow its link. Open your Google Account independently and review recent security activity (opens in a new tab). No matching alert does not, by itself, prove the email is fake. If you cannot independently verify the request, do not provide credentials or act on it.
To report a phishing message in desktop Gmail, open it, select More beside Reply, then Report phishing. Opening the message is not an instruction to click its links or attachments. See Google’s phishing guidance (opens in a new tab).
The general rule: verify through a channel you opened yourself, never through the message.
Troubleshooting
I did not get a Google prompt
Check that the intended phone is online and signed in to the correct account. Select Try another way to use an available method you previously configured. An authenticator app can generate codes without a mobile connection; a Google prompt needs connectivity. Do not approve an unexpected prompt.
I lost my phone
To locate a missing Android phone, use Google Find Hub (opens in a new tab) from another device. Follow the requirements for the action you choose: securing or erasing the phone requires it to be signed in, powered on and connected, with Find Hub enabled and the device visible on Google Play. Signing out can affect remote actions.
Start with locating or securing the device where appropriate. Erasing it permanently deletes device data and makes it unavailable in Find Hub; it may not erase an SD card. Treat erasure as a deliberate last-resort decision, not a routine test.
If theft or account misuse is suspected, prioritize protecting access from another trusted device. Review the lost device’s sessions, passkeys, 2SV methods and recovery options; remove access you no longer control. Do not delay securing a compromised account just to keep location features available. For an iPhone, follow Apple’s lost-device instructions (opens in a new tab), not the Android procedure.
I see a sign-in I do not recognize
First, check whether it was you on a VPN, a second phone, or a mobile network. If your account may be compromised:
-
If locked out: Start with Google Account Recovery (opens in a new tab).
-
If still accessible: Change an exposed or compromised password, review recent security activity and sign out unfamiliar sessions under Google Account > Security & sign-in > Your devices > Manage all devices.
-
Review and remove unauthorized passkeys, security keys, recovery details, and third-party app access.
-
Check your computer for harmful software and remove suspicious browser extensions.
-
Verify your security and recovery settings. Changing your password alone may not resolve every compromise.
Follow Google’s compromised-account guidance (opens in a new tab). Recovery is not guaranteed.
Check Gmail forwarding, filters and delegates as described in Step 12. Follow Google’s guidance for other affected accounts, including reused passwords and accounts that rely on this email for access or recovery.
I am locked out
Use Google Account Recovery (opens in a new tab) from a familiar device, browser and location. Answer the questions as accurately as you can and follow Google’s recovery tips (opens in a new tab). Do not share your password or verification codes with anyone offering to recover the account for you.
I removed access, and now an app stopped working
Reconnect it only if you still need and trust it. Review the requested permissions before granting access, and do not restore a connection you removed because it was suspicious.
Optional privacy review. Activity history and ad personalization are separate from preventing unauthorized account access. Review Google Account privacy settings (opens in a new tab) if you also want to change what Google saves or how it uses that data.
A Maintenance Routine
Review these settings periodically, for example monthly, and after a lost device, an unfamiliar security alert or an important access change. Do not wait for a scheduled review when something looks suspicious.
-
Review Security Checkup recommendations, verify affected settings and record anything still unresolved.
-
Read recent security activity.
-
Review devices and sign out of anything unfamiliar.
-
Confirm the recovery phone and email still work.
-
Remove linked apps you no longer use.
-
Review Gmail forwarding, filters and delegation.
-
Note any phishing messages you received and how you handled them.
Final account-security checklist
Before you finish, check that:
-
Your chosen sign-in method works, and an independent backup remains accessible.
-
Your recovery details are current and belong to people or accounts you trust.
-
You have reviewed unfamiliar sessions and security events.
-
App permissions match the access you intended to grant.
-
Gmail forwarding, filters and delegates reflect your choices.
-
Anything you could not verify is recorded for follow-up; you have not dismissed a warning simply to clear it.
These checks reduce avoidable risks, but they do not guarantee that an account will remain secure. Repeat the review when your access or devices change, and use Google’s incident-response guidance if you suspect compromise.
Frequently asked questions
Do I need to change my password just because it is old?
Review whether it is unique, sufficiently long or potentially exposed. Change a reused, weak or compromised password. Google recommends a long, unique password of at least 12 characters (opens in a new tab); a date on its own does not establish compromise.
Does a passkey remove my password or recovery options?
No. Adding a passkey does not remove existing authentication or recovery factors (opens in a new tab). Keep working alternatives available, especially if you could lose access to the device holding the passkey.
Does changing my password remove every other access route?
No. Google documents exceptions to automatic sign-out after a password change (opens in a new tab). Review device sessions, linked-app permissions and Gmail rules separately. If you suspect unauthorized activity, follow the compromised-account procedure rather than relying on a password change alone.